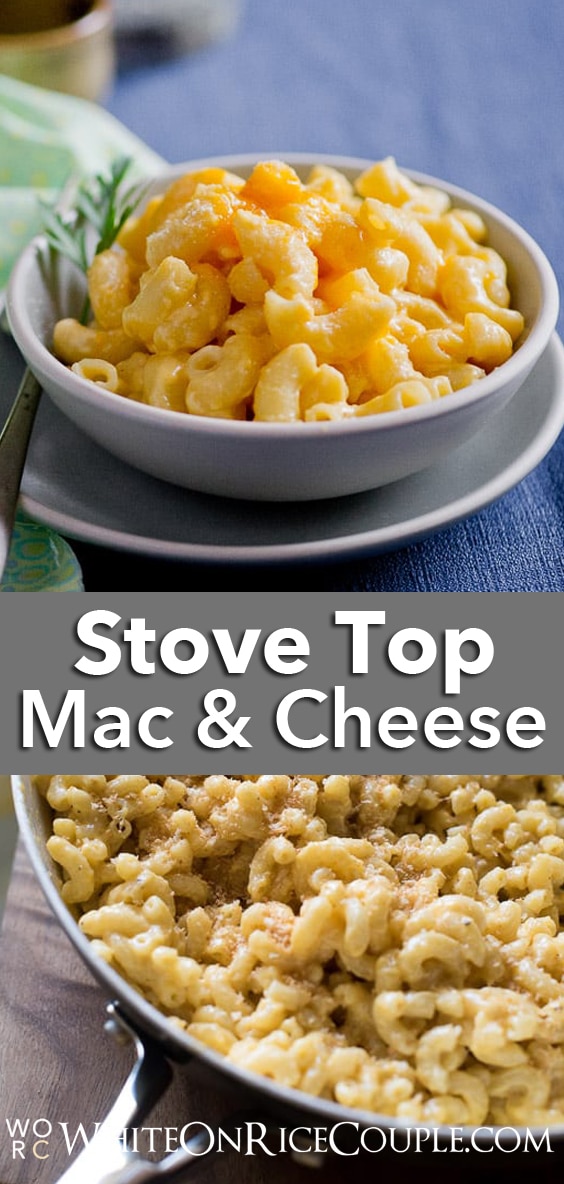
One Pot, Stove Top, Creamy Mac and Cheese – My decadent revolution

Update: This Stove Top One Pot Mac and Cheese was originally shared in 2009. It now has new step-by-step photos, video and updated technique to satisfy all our hungry readers. Also, try this “healthier” version of Broccoli Mac and Cheese. It’s another reader favorite.
Stove Top Mac and Cheese Recipe
I’m calling for a mac and cheese recipe revolution. For those sweltering Summer days when cranking up the oven means turning our kitchen into a sauna, or for those times when I don’t want to be a dishwasher, but still want to have a satisfying home cooked meal, I need a meal that can be cooked fairly quickly and efficiently. Enter the solution and what I call, my mac and cheese revolution: the One Pot, Stove Top, Creamy Macaroni and Cheese recipe.
Watch this delicious Stove Top Creamy Mac and Cheese Video:
Start by boiling small macaroni in water on low simmer
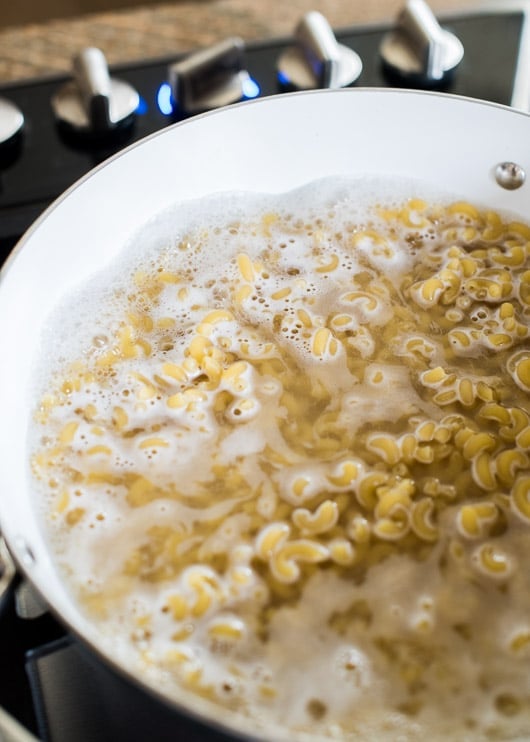
constantly stir so that macaroni doesn’t stick

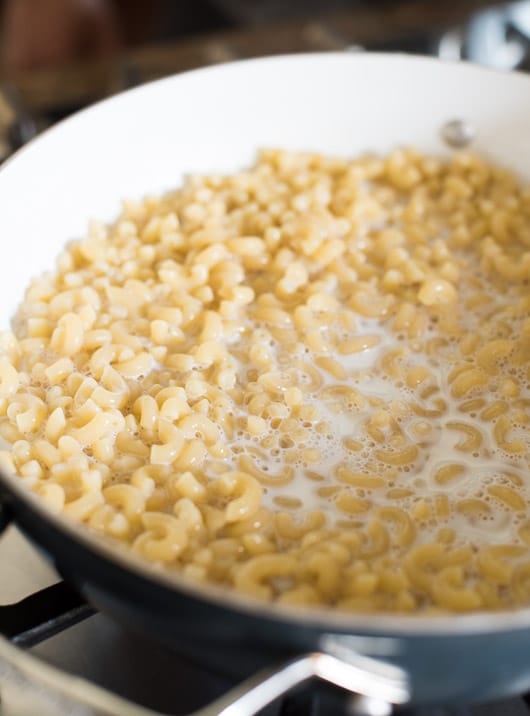
after macaroni is pre-cooked in water, add milk and simmer on low heat
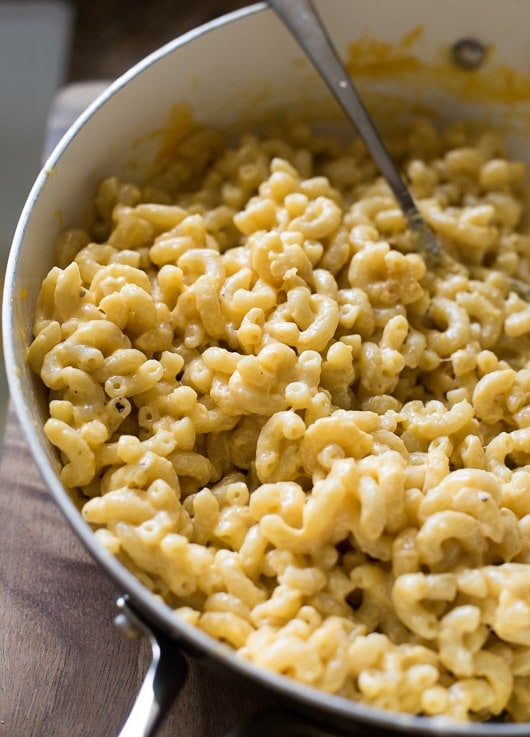
when macaroni is plump, tender and cooked, add the cheese
optional- add toasted bread crumbs or panko for extra crunch and texture
 How to Make One Pot, Stove Top Macaroni and Cheese Recipe
It’s simple, clear, and considerate of everything we need in order to still eat well and prepare quickly, without compromising on quality and taste.
- – One Pot– Yes, you read it correctly. All the raw macaroni is cooked in one pot, without a pre-boil step that most other stove top recipes require. There is no extra pot to pre-boil or wash. One pot means less dishes!
- – Stove Stop- Stove top means NO oven. During our hot summer days, that last thing that I want is to turn on my oven and sweat even more just for a bowl of mac and cheese. The stove top method is a wonderful way of cooking the macaroni pasta, quickly and to your desired texture. I can control exactly how soft or al dente I want my macaroni to be.
- – Creamy – This mac and cheese recipe is slowly cooked in water, then milk and a little butter. The cheese is added in the end and it’s so creamy and amazing.
- – Flavor blasts with creative cheeses- Now that I’ve figured out how to cook it easily and still maintain great texture, now comes the best part—-great flavor! Have fun with this recipe and experiment with flavorful, cheeses that melt well. My favorite is using parmesan and asiago cheese because I can use less cheese and still have bold flavor. Every single bite is delicious.
I’m still a huge fan of oven baked mac and cheese because the warm, comforting, casserole bake can’t be compromised. The cheesy crusts are a show stopper too. But when I’m starving and the weather is scorching hot, the last thing I want to do is to blast that oven to 350°F.
happy Stove Top Creamy Mac and Cheese times to you,
-diane


Toasted bread crumbs: I love toasted bread crumbs and it’s so easy to make. Just break up some old bread, heat it up on a skillet. Continue stirring until crumbs start to brown and become fragrant. Remove from heat and top off your macaroni and cheese!

One Pot, Stove Top Macaroni & Cheese Recipe
Ingredients
- 1 pound (454 g) small elbow macaroni , uncooked
- 3 cups (720 ml) water (approximately)
- 2 cups (480 ml) low-fat Milk , or more if needed
- **if more milk is needed , additional 1/4 cup milk at a time for final cooking. **Macaroni pasta varies so much! have additional milk on hand, or be ready to increase the heat if your macaroni doesn't absorb fast enough.
- 1 tablespoon (15 ml) Butter , for flavor
- 1/2 teaspoon (2.5 ml) Mustard powder
- 1 teaspoon (5 ml) Salt , plus additional for final season later
- generous dash of Nutmeg
- 8 ounces (227 g) Grated Cheddar Cheese , any one or combination of (jack, cheddar, swiss, mozzarella, gouda, parmesan*, asiago*, pecorino*) *Hard cheeses are best combined with a secondary, softer, better melting cheese. Cheese varies in flavor and salt level too! The more cheddar cheese you use, the creamier the mac and cheese will be
additional toppings:(optional)
- bacon bits
- bread crumbs
- chopped parsley
- diced tomatoes
- black pepper to taste (optional)
Instructions
- Place raw elbow macaroni in colander and quickly rinse under water. Let drain.
- In medium sauce pot (about 3.5 qt), add water and raw elbow macaroni. Heat the pot on medium heat to bring the mixture to a low simmer and keep the flame consistent to maintain the low simmer.
- Stir the macaroni frequently as it comes up to a simmer. This will separate macaroni and keep them from sticking together. DO NOT LEAVE THE STOVE! The mixture will come to a low boil very quickly and leaving it unattended will leave a big mess on your stove stop.Once mixture comes to a simmer, add the milk and bring the mixture back to a low simmer. Then immediately turn down heat to LOW. Macaroni will slowly cook in the milk. Having your heat too high will burn the milk and scorch your pan
- Continue to stir the mixture frequently so that macaroni will cook evenly and absorb milk evenly. If you don't stir your mixture frequently, you will get a big clump of macaroni in the end! Stir, stir stir!Cook for about 10 minutes or until macaroni is tender. Make sure there is still some milk in the pot to melt the cheese, which makes the mac and cheese creamy. **If macaroni is not cooked fully, add a little more milk to mixture ( in small amounts) until macaroni is fully cooked.
- When the macaroni is plump and cooked, add the mustard powder, salt, nutmeg and grated cheddar cheese. Stir the cheese mixture evenly into the macaroni. We will add more milk to the pot if needed, then add the cheese to make the mixture more creamy.
- Take a final taste and add additional salt to taste. Before serving, stir one final time to mix everything together. Turn off heat and serve immediately.Add bread crumbs for a crunchy bite if you wish.


It was delicious! I gave up on the Kraft crap years ago because it just didn’t taste like food.
I cut everything in half and it worked perfectly. I had to skip the nutmeg, since I don’t have it, and I used a spoonful of Dijon mustard since I don’t have dry. The combo of parmesan, fresh mozzarella, and English cheddar was really good. I maybe would *slightly* cut back on the cheese next time, since it could just have possibly been *too* cheesy…
Such a great recipe/method!
Thanks for posting. 🙂 I made this today, and I didn’t mess it up! Woo hoo!
I only regret skipping the butter. I’ll try this again with butter and different cheeses.
I shared your recipe on DeviantArt:
http://arunadiespretty.deviantart.com/#/d4txnpo
Looks great. I cannot stand “fake” make and cheese. A lot like mom’s baked version. I do so love those crunchy/chewy bits on top when you bake it, though…maybe I can give it a quick broil in the toster oven…mine’s big enough to get an 8×8…or maybe just do individual serving sizes.
saw on pinterest.
Its so hard to look at this when I’m hungry. I read the directions and my stomach growls at me. I’m always going to look up my next meal on pintrest.com
Ok first of all I don’t care for baked mac and cheese. If it goes in the oven it’s simpy to broil a topping of cheese. I’ve been searching for a great tasting stovetop mac and cheese! I think this is THE one!!! I used a combo of american and sharp cheddar!. I love my pasta to be al dente and this stove top version allows me to control how much the pasta is cooked. I did end up adding more milk during the cooking…almost 1/2 cup of warmed milk. It’s very good and I think this may be the one that keeps me from using the blue box!
This was delicious but it took waaaay longer than 20 minutes, near on an hour to cook the macaroni and then only because I added some water in the end instead of milk. Next time I’ll start with water and finish with milk, think it will be quicker.x
I made this tonight. I didn’t have a back up plan, so I had to send my husband out for take out. I followed everything to the T, but the noodles just would not stop being oddly chewy. It seemed kinda al dente, but even after more and more cooking and baking, they are STILL kinda chewy. The creaminess of the milk and pasta was awesome, and the cheese mixed in seemed great, too. The only problem was in the noodles. I have very picky eaters and I knew my son would have gagged by the hardness of the noodles. I should maybe have let it simmer longer? The second it got to simmering, I put it on low. At any rate, I could see how it *could* be good, but it didn’t work out tonight!
Made this tonight and it was DELISH!!!! I kept the lid on between stirring and added milk and a hunk of velveeta at the end for added creaminess….best to eat it right when it’s ready because it continues to soak up the liquid. YUM!
I tried this as one of our side dish to accompany a pork loin roast tonight. I should say that my MIL makes the BEST macaroni and cheese in the whole world, and hers is the gold standard I use to compare every recipe against. None have yet to come close, but I keep searching for the mac-n-cheese “holy grail!”)
I’m glad others were satisfied with the results achieved with this arguably unique technique. Regretfully, we found it too gummy. (Gummy is not the same as creamy.) I followed the ingredients and directions to a T, except for the nutmeg (not a fan of nutmeg in my pasta dishes.) It’s back to my own baked and stovetop recipes. My stovetop technique requires just one pot and one colander, as this one did – I drain hot pasta in it while I return the pot to the stove and make the Bechamel sauce and add cheese.
After attempting this recipe, I decided there’s no more work involved with washing out the colander – and maybe a little more forgiveness in that I can start the pasta and leave it unattended for a few minutes. Even if there were more work, it’s worth it to have more control over the texture of my pasta. Thanks for sharing the recipe, and I’m glad it worked for others. For us, I’ll chalk it up to “nothing ventured, nothing gained!”
Best,
Terry
oh this is to-die-for! i’ll make one ASAP.
I quadrupled this recipe for a potluck lunch. Takes longer for the pasta to cook obviously (about 40 minutes) and had to add about 16 oz of water to help the pasta cook completely. It tastes is A-M-A-Z-I-N-G! No flour means no lumps, no grainy taste in the mouth. Love this recipe! And all the stirring is a good workout for the arms!
thanks for sharing. made this tonight. i made it as per your instructions. i did need to add another 1/2 cup of milk. i left out mustard and added a little too much nutmeg, but the result was awesome. i stirred it constantly. my dh said that it is the richest mac and cheese he has ever eaten. my girls loved it. thanks again!
Made this tonight after finding it on Pinterest. I tripled the recipe, to use up an entire bag of noodles (I thought I was going to double it, but I measured out the rinsed pasta with a dry measuring cup, and found the 16oz of shells was a full 6 cups, so increased the milk & other ingredients accordingly), and it did turn out a bit soggy, but nothing too bad. I was making what my family calls ‘tuna glop’ (mac & cheese with tuna and peas) anyway, so being a bit gloppy was no problem. 😉
I checked the pasta as it cooked, and it seemed about done before all the milk was absorbed, but I knew I’d be adding more stuff, so that worked for me. When the pasta was ready, I added about 3 cups of shredded mild cheddar and stirred to melt it. Then I turned off the heat and added about 2 cups of frozen peas (still-frozen) and 2 cans of drained tuna.
My 6-year-old and husband loved it, and I enjoyed it as well. Thanks for the recipe!
This was way too salty, I’ll try it again and wait to add salt to taste at the end. Thanks for the recipe!
wow this is amazing! i’m a HUGE mac and cheese fan-but always from scratch. i’ve been making a rue for so long to get the best texture. your recipe has replace my stand by
Made this tonight with light soy milk, shredded cheddar, no butter and ‘smart taste’ macaroni and it came out great! I was worried about the soy milk but it is completely fine as long as you’ve had soy milk before and know the flavor. Thanks for such a great twist on my favorite meal!