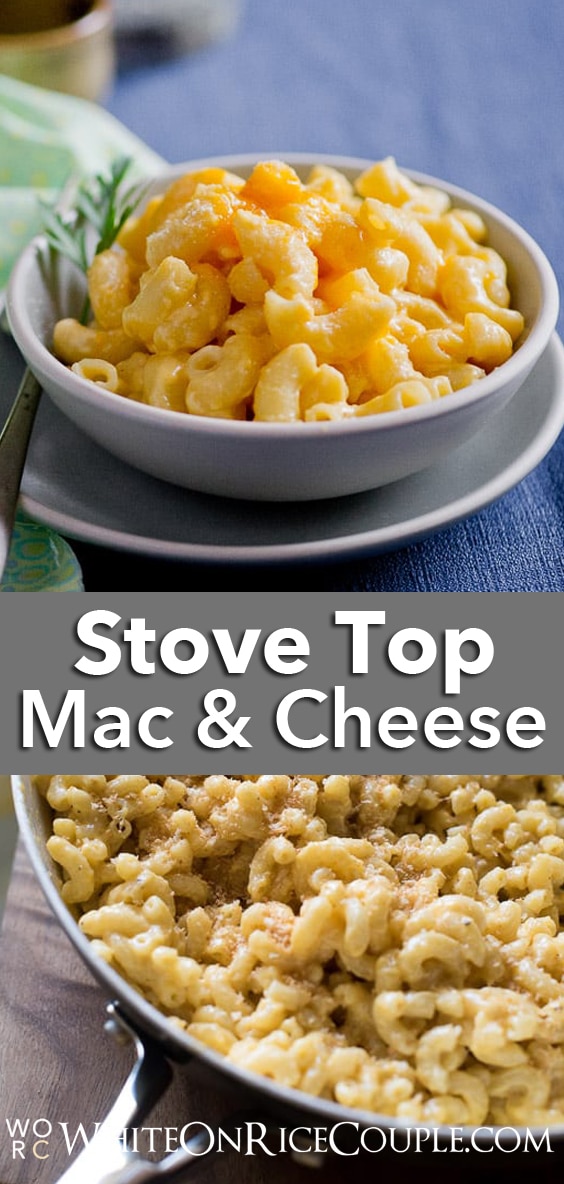
One Pot, Stove Top, Creamy Mac and Cheese – My decadent revolution

Update: This Stove Top One Pot Mac and Cheese was originally shared in 2009. It now has new step-by-step photos, video and updated technique to satisfy all our hungry readers. Also, try this “healthier” version of Broccoli Mac and Cheese. It’s another reader favorite.
Stove Top Mac and Cheese Recipe
I’m calling for a mac and cheese recipe revolution. For those sweltering Summer days when cranking up the oven means turning our kitchen into a sauna, or for those times when I don’t want to be a dishwasher, but still want to have a satisfying home cooked meal, I need a meal that can be cooked fairly quickly and efficiently. Enter the solution and what I call, my mac and cheese revolution: the One Pot, Stove Top, Creamy Macaroni and Cheese recipe.
Watch this delicious Stove Top Creamy Mac and Cheese Video:
Start by boiling small macaroni in water on low simmer
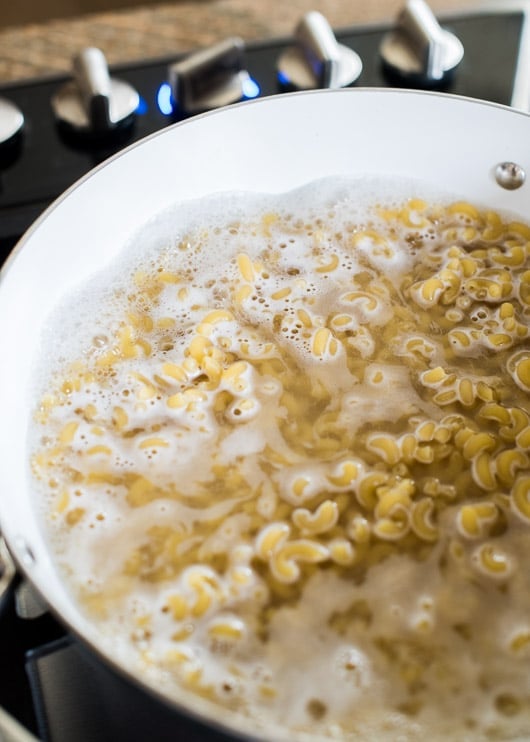
constantly stir so that macaroni doesn’t stick

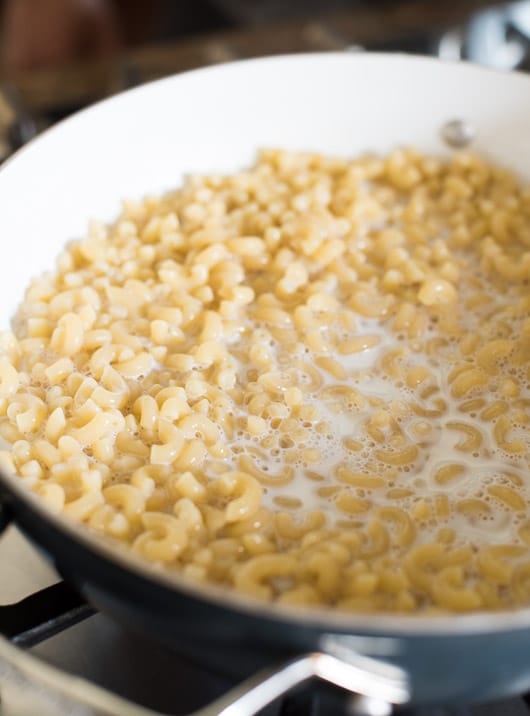
after macaroni is pre-cooked in water, add milk and simmer on low heat
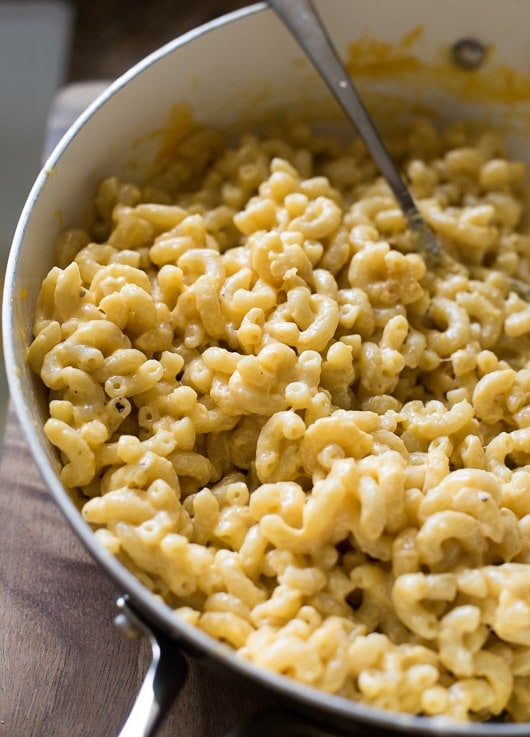
when macaroni is plump, tender and cooked, add the cheese
optional- add toasted bread crumbs or panko for extra crunch and texture
 How to Make One Pot, Stove Top Macaroni and Cheese Recipe
It’s simple, clear, and considerate of everything we need in order to still eat well and prepare quickly, without compromising on quality and taste.
- – One Pot– Yes, you read it correctly. All the raw macaroni is cooked in one pot, without a pre-boil step that most other stove top recipes require. There is no extra pot to pre-boil or wash. One pot means less dishes!
- – Stove Stop- Stove top means NO oven. During our hot summer days, that last thing that I want is to turn on my oven and sweat even more just for a bowl of mac and cheese. The stove top method is a wonderful way of cooking the macaroni pasta, quickly and to your desired texture. I can control exactly how soft or al dente I want my macaroni to be.
- – Creamy – This mac and cheese recipe is slowly cooked in water, then milk and a little butter. The cheese is added in the end and it’s so creamy and amazing.
- – Flavor blasts with creative cheeses- Now that I’ve figured out how to cook it easily and still maintain great texture, now comes the best part—-great flavor! Have fun with this recipe and experiment with flavorful, cheeses that melt well. My favorite is using parmesan and asiago cheese because I can use less cheese and still have bold flavor. Every single bite is delicious.
I’m still a huge fan of oven baked mac and cheese because the warm, comforting, casserole bake can’t be compromised. The cheesy crusts are a show stopper too. But when I’m starving and the weather is scorching hot, the last thing I want to do is to blast that oven to 350°F.
happy Stove Top Creamy Mac and Cheese times to you,
-diane


Toasted bread crumbs: I love toasted bread crumbs and it’s so easy to make. Just break up some old bread, heat it up on a skillet. Continue stirring until crumbs start to brown and become fragrant. Remove from heat and top off your macaroni and cheese!

One Pot, Stove Top Macaroni & Cheese Recipe
Ingredients
- 1 pound (454 g) small elbow macaroni , uncooked
- 3 cups (720 ml) water (approximately)
- 2 cups (480 ml) low-fat Milk , or more if needed
- **if more milk is needed , additional 1/4 cup milk at a time for final cooking. **Macaroni pasta varies so much! have additional milk on hand, or be ready to increase the heat if your macaroni doesn't absorb fast enough.
- 1 tablespoon (15 ml) Butter , for flavor
- 1/2 teaspoon (2.5 ml) Mustard powder
- 1 teaspoon (5 ml) Salt , plus additional for final season later
- generous dash of Nutmeg
- 8 ounces (227 g) Grated Cheddar Cheese , any one or combination of (jack, cheddar, swiss, mozzarella, gouda, parmesan*, asiago*, pecorino*) *Hard cheeses are best combined with a secondary, softer, better melting cheese. Cheese varies in flavor and salt level too! The more cheddar cheese you use, the creamier the mac and cheese will be
additional toppings:(optional)
- bacon bits
- bread crumbs
- chopped parsley
- diced tomatoes
- black pepper to taste (optional)
Instructions
- Place raw elbow macaroni in colander and quickly rinse under water. Let drain.
- In medium sauce pot (about 3.5 qt), add water and raw elbow macaroni. Heat the pot on medium heat to bring the mixture to a low simmer and keep the flame consistent to maintain the low simmer.
- Stir the macaroni frequently as it comes up to a simmer. This will separate macaroni and keep them from sticking together. DO NOT LEAVE THE STOVE! The mixture will come to a low boil very quickly and leaving it unattended will leave a big mess on your stove stop.Once mixture comes to a simmer, add the milk and bring the mixture back to a low simmer. Then immediately turn down heat to LOW. Macaroni will slowly cook in the milk. Having your heat too high will burn the milk and scorch your pan
- Continue to stir the mixture frequently so that macaroni will cook evenly and absorb milk evenly. If you don't stir your mixture frequently, you will get a big clump of macaroni in the end! Stir, stir stir!Cook for about 10 minutes or until macaroni is tender. Make sure there is still some milk in the pot to melt the cheese, which makes the mac and cheese creamy. **If macaroni is not cooked fully, add a little more milk to mixture ( in small amounts) until macaroni is fully cooked.
- When the macaroni is plump and cooked, add the mustard powder, salt, nutmeg and grated cheddar cheese. Stir the cheese mixture evenly into the macaroni. We will add more milk to the pot if needed, then add the cheese to make the mixture more creamy.
- Take a final taste and add additional salt to taste. Before serving, stir one final time to mix everything together. Turn off heat and serve immediately.Add bread crumbs for a crunchy bite if you wish.


I’ve been searching for a fast mac&cheese without processed cheese or flour and finally found this one!! Can’t wait to try!
Saw the recipe on Pinterest & had to try it!
I love that you include special instructions so that you don’t cook the pasta & milk too fast.
It was super-yum.
I used French’s mustard since I don’t have mustard powder & cayenne instead of nutmeg. I used whole wheat shells & bagged shredded cheddar cheese, which I rinsed & drained before adding to the pot.
Creamy! I will be making it again.
O. M. G. This mac and cheese is over the top and completely satisfied. And the best part of all is how easy it is to make it gluten free! Since being directed by my doctor to be gluten-free, I have missed comfort faves like pancakes, sandwiches, and mac-n-cheese, but this recipe, when made with pasta made of rice or corn (Trader Joe’s and Sprouts Markets), hits the yummy tummy spot! I was so happy at how gooey the sauce turned out, just by cooking the noodles in the milk – no roux required! In fact, I added too much cheese my first go-round!
Rice pasta needs more milk and time to cook, but very easy to add milk as I went. Thank you for this saving-grace recipe and making gluten-free not taste-free!
I made this last night and it’s awesome! You really do have to follow the recipe and constantly stir over LOW heat. Thanks for a new favorite!
This is similar to a recipe I found on the back of a box of Barilla a few years ago. That one calls for sauteeing diced onions in butter before adding the milk to the pot (then boil the milk before adding the macaroni). The recipe also calls for fontina, which is delicious. Frankly, it’s pretty good even before you add the cheese.
I usually add the pasta, stir it for a minute, then turn the heat to medium-low, cover and walk away. I’ve never had much problem with sticking, and the pasta keeps its shape quite well.
Just cooked this for my kids tonight… it it was SO good! I wanted to give them something “real” rather than the ol’ KD they keep asking for.. It turned out perfect! I used the Catelli Smart Pasta, macaroni and (for the kids) I didn’t use the Nutmeg or dry mustard.. I used a pinch of Garlic powder instead.. I also added a bit of butter with the milk (and a little salt) I did rinse the pasta first and waited for the milk (skim) to come just to a bowl (on Med heat) before adding the macaroni. I waited for it to come to another bowl before bringing down the heat to low (med-low) I kept stirring (not constantly but very often, so the heat would have a chance to come through.. if that makes sense) I kept adding a bit more milk throughout the cooking process just to keep the pasta well coated.. I probably added 1/2 cup or so more. The heat was mostly on Low to Med-Low.. It took about 30 mins to cook as I wanted to be patient with the pasta and not rush things.. It sure paid off! I added Cheddar (med – for kids) and one slice of process cheese for smoothness.. It does help. with a little more butter to “cream” things up.. This was for the kids, so I wasn’t too concern about calories here.. =) I only did 1/2 a recipe this time in case it didn’t work out.. but it was lots for my 2 girls.. We all loved it!! As far as too salty, I seasoned it to our taste, starting with less and adding more as needed.. The texture/consistency was perfect! I took my time on low heat and kept a good watch throughout the cooking process.. I was a little worried by using “pre-shredded” cheese (all I had on hand) but by adding one slices of process cheese, it really helps to smooth the sauce.. (I used that trick before with broccoli and cheese soup) Plus, perhaps adding a bit of butter along with the cheese helps to smooths things out too.. Not sure, but I just love the taste.. =) All in all, I was pleasantly surprised at how good it was and how well it turned out.. Creamy and tasty!
Sincerely,
Diane
I love this recipe and so does my family! I just boil the noodles in water and cut the milk by about 1/2 cup. I melt the butter (about 2 tbsp.) with the milk in the same pot. Add the cheese (cheddar and parm), the drained noodles, and bacon (the real bacon bits work great). Mix until combined and oh my!! No more rue, no more fuss. I also like to add crushed crackers and more cheese on top and bake / broil until lightly browned.
I made this with coconut milk. Oh, and I made it in the microwave, zapping and stirring for two minutes at a time. At first, I was a little disappointed because the sauce was too thin. Then I got a phone call, which caused me to leave it in the microwave for about ten minutes. When I got back to it, it was absolutely perfect. I couldn’t be happier. Thank you!
My boyfriend recommended this recipe to me, as we were looking for a simple, basic stove-top mac & cheese recipe. He knows I’m not particularly skilled in the kitchen (yet) so I avoided cooking the noodles in milk and instead opted for cooking in water like normal and adding about 1/3 cup of milk after draining the cooked pasta + water. Then I added in my (self-grated) cheddar cheese, dry mustard, and salt. It was a huge hit here, and maybe one day I’ll work up to cooking the noodles in the milk.
This has become my personal new favorite stove-top mac & cheese recipe, particularly because of the dry mustard. I was using a recipe before that called for only 1/4 teaspoon….amazing what double that amount does for the taste!
Thank you!
Do you think I could use plain soy milk for this recipe?
We haven’t tried it, so we can’t say for sure. Several of the people in the comments have mentioned having great success with other milks (almond milk, coconut milk, and soy milk). Sometimes they’ll mention adjusting the milk quantity a bit but it seems to come out great.
I made this and it turned out great, I used Cheddar Jack and spiral pasta and my family loved it.
You have made this med student very happy. <3
This recipe is fantastic. I did not have coriander or the dry mustard, but it was still wonderful ( bet it would be better with both). I know readers will find this hard to believe (I was apprehensive to try it) but it was suggested to me by a friend to use unsweetened Almond milk (Blue Diamond brand) as oppose to dairy milk. My husband, who is a total carnivore, did not even notice! He loved it. I used organic cheddar and parmesean cheese, and added more than one cup, maybe another 1/2 cup. I used organic cavatappi pasta which needed a little more unsweetened almond milk throughout the cooking process. Not that much more, but as the timer was getting below 10 minutes I definitely added more almond milk, 1/4 cup at a time. It was creamy and yummy, great for the winter. I am delighted to have found this recipe.
Oh, also, I topped this with some canned chili and made halfway homemade chili mac. It was the perfect consistency and creaminess to offset the chili. Not all mac and cheese can be used for chili mac, but this one is perfect. I am so so so in love.
I just made this using egg noodles, because that was what I had in the house. It turned out spectacularly. When my noodles were done to the point I liked them there was still about an 8th of an inch of milk in the bottom of the pot. I decided to just throw the cheese in and figured I’d add some flour to thicken if necessary. I ended up adding a little more cheese than the recipe called for, but it completely worked. No flour necessary and there was even some extra cheese sauce in the bottom I got to scoop up with a spoon. So for those of you who ended up with mush, maybe just stop cooking the noodles earlier. If the milk isn’t completely cooked down, it will proabably be ok. Thanks so much for the post!!!! I always want creamy mac and cheese, but all the recipes I had seen seemed so daunting. This one can be made on a whim!
very good i made it without the nutmeg and it was still good