Principles of Photography- Aperture (Controlling Depth of Field)
In our Principles of Photography Workshop Series we try our best to share what we were able to teach ourselves about photography, in simple, easy-to-understand concepts. These are just some basics to help you get started, there is much more information to learn beyond these basics. But by understanding the most basic principles of photography then building upon them through practice, practice and more practice, you can capture the type of images that you want.
Note: Teaching and understanding photography can be often be complicated and confusing. Of course, there are many ways to explain these concepts & there is no “right” way to teach this. So if you think you can explain it better, then obviously you don’t need our help. Now, everyone grab your camera and let’s start figuring this stuff out together! And have fun!
Our last discussions were about Exposure, then Shutter Speed. Reading about these two concepts first will be helpful in understanding this whole series!
As mentioned in the previous post, Shutter Speed is about controlling motion with the amount of light entering your camera. Shutter Speed works in conjunction with Aperture to create the total Exposure of the photograph.
What is Aperture?
- Aperture is about the AMOUNT, the amount of light that enters your camera through the lens “hole” or the “eye” of the camera.
- Once the light enters the hole opening in the lens, it then enters your camer
What is the Aperture on your camera?
- Just like the pupil in our eyes that open and close depending on the amount of light we see, the camera has an eye too, which is the Aperture.
- When our eyes need more light, the pupil opens up (creates a bigger opening) to let in more light. When there is too much light, the pupil gets smaller (creates a smaller opening) to let in less light.
- So, the Aperture does the exact same thing for the camera, but the Aperture “hole” opening lies within your lens.
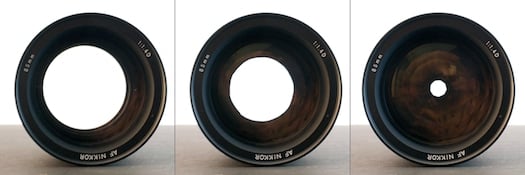
(LEFT) f/1.4, the opening is big, lets a lot of light through (MIDDLE) f/5.6 , (RIGHT)f/16- the opening is small, lets less light through.
How is Aperture measured?
- Aperture is measured in the size of the “hole” opening in the lens
- Aperture is measured in a measurement called “f-stops”
- The size of the aperture hole opening determines the f-stop number
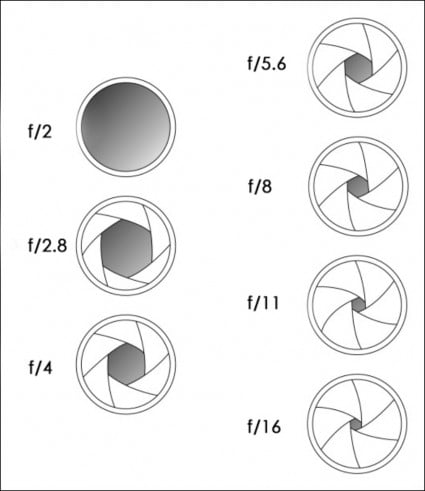
- The BIGGER the aperture hole opening, the MORE light comes in, which gives a SMALLER f-stop number.
- The smaller f-stop numbers (such as 1.4, 2.8) let more light into the camera, and these numbers are considered “FAST”
- So when you hear of terms like “fast lens”, “fast aperture”, “fast f-stop”, just know that means the lens is able to open up WIDE and letting more light coming in.
- More confusing terms you will hear when describing the big hole opening: “Stop down your f-stop”, “wide aperture”, “open up your f-stop”. All that means is to let more light into the camera by opening up the aperture hole opening, which you do by making the number smaller.
- The SMALLER the aperture hole opening, the LESS light comes in, which gives a BIGGER f-stop number
- The bigger f-stop numbers (such as 6 or bigger) let less light into the camera, and these numbers are considered “SLOW”
- So when you hear of terms like “slow lens”, “slow aperture”, “slow f-stop”, just know that means the lens hole is SMALLER and give you less light coming in.
- More confusing terms you will hear when describing the smaller hole opening” “Stop up your f-stop”, “small aperture”, ” close your f-stop”. All that means is to let less light into the camera by closing up the aperture hole opening, which you do by making the number bigger.
Wait! This is confusing! Big opening, why smaller f-stop number? Small opening, why big f-stop number? Why is it opposite?
- Right! This is why everyone gets so confused and frustrated about understanding aperture!
- It makes sense that the bigger the Aperture opening, the more light comes in, but why is the f-stop number smaller?
- And, it makes sense that the smaller Aperture opening, the less light comes in, but why is the f-stop number bigger?
- Answer- The bastards who set it only wanted to confuse everyone! Just kidding, it is actually in reference to the lens’ focal ratio, but we won’t get into it further because it will make your head spin. For now it may be more helpful to understand what the numbers do with the following little analogy:
- Try understanding the f-stop number relationship this way:
- Imagine your windows as the aperture on your camera (stand in front of your windows if this exercise helps), with the drapes hanging.
- Pull all the drapes to the edges, more light comes in, right? So you just opened up the aperture “hole” opening, by letting in more light. Imagine the small f-stop number as the amount of drapes that is covering the hole.
- So, you have LESS drapes covering the light coming in, the less drapes equals the SMALLER f-stop NUMBER!
- More light comes in= less drapes covering the window = smaller f-stop number.
- Exercise again: Pull more drapes in, covering more of the window, which means less light comes in.
- So, you have MORE drapes covering the window, the more drapes equals the BIGGER f-stop NUMBER!
- Less light comes in = more drapes covering the window = bigger f-stop number.
- Finally, imagine the f-stop number as the amount of coverage, covering up the light opening.
How to control Aperture?
Just like controlling the amount of light into your room by opening and closing the window shutters, you can control your Aperture and how much light enters your lens, then to your camera. Essentially controlling your Aperture is one part of controlling your total Exposure
- Most camera’s will have a “Aperture Priority” function on your camera. You can choose your Aperture and make it fast or slow by turning the dial. Your camera will automatically adjust the rest of the exposure settings.
- You can control it on “Manual”, but this will take more practice because you will have to manually control the rest of the exposure components (Shutter Speed and ISO).
Why would I want to understand Aperture? Isn’t it easier to just shoot on “auto” or “program” and let the camera do it all the thinking for me?
- Certainly on most occasions, letting the camera do all the thinking for you will give you good results.
- BUT, in order to take your photography to a higher level and more CREATIVE CONTROL, you must learn Aperture.
OK, so what exactly does this Aperture thing-y do? How will it give me more choices and creative control? – Answer: DEPTH of FIELD
- The primary creative control of Aperture is to control the “Depth of Field”, which means how much of the image you want to be in focus.
- By controlling the amount of light coming into the camera by the size of the Aperture hole opening, you control how much FOCUS you want.
- When you’re photographing something with a NARROW or SHALLOW depth of field, that simply means that you want something specific to be in focus (only one part) and the rest to be kinda blurry.
- When you’re photographing something with a WIDE or DEEP depth of field, that simply means that you want more of the picture to be in focus.
EXAMPLES of Aperture controlling your Depth of Field- how much you want to be in focus:

Foreground: the single tomato and the wood in the very front of the image is sharp, in focus.
Midground: the cluster of tomatoes is less in focus, kinda blurry
Background: the tomato leaf, and basket of tomatoes is very blurry, out of focus.
This was shot intentionally so that the focus would be on the single tomato, bringing the perspective to the single tomato. Still pretty, isn’t it?
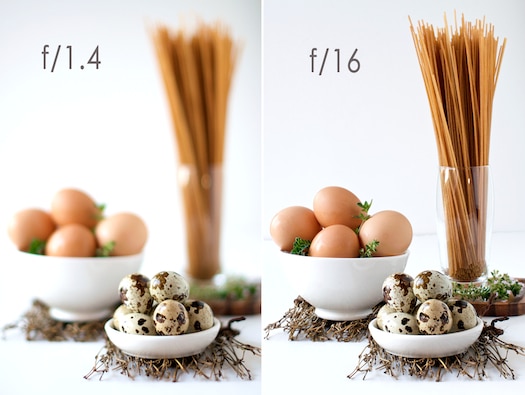
Egg & Pasta Image:
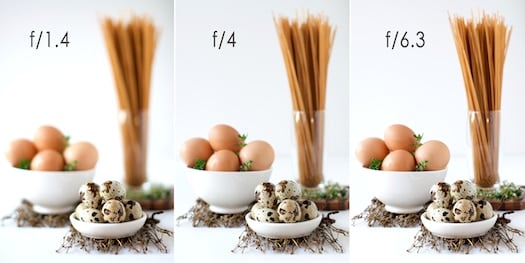
- In the f/1.4 image, you can see how selective the focus is: only the quail eggs in the foreground are in focus.
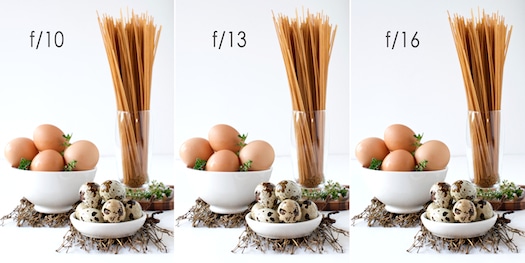
- As the f/stop closes to let less light in (number gets bigger), more of the image starts to come into focus.
- In f/6.3, the brown eggs start to come into focus.
- In f/16, everything is in focus: quail eggs, brown eggs and pasta.
(Bottom) You can see the obvious depth of field difference between the two extreme f-stops. The f/1.4 has a very shallow depth of field (only quail eggs in focus), vs. the f/16 which has a very wide depth of field (everything is in focus)
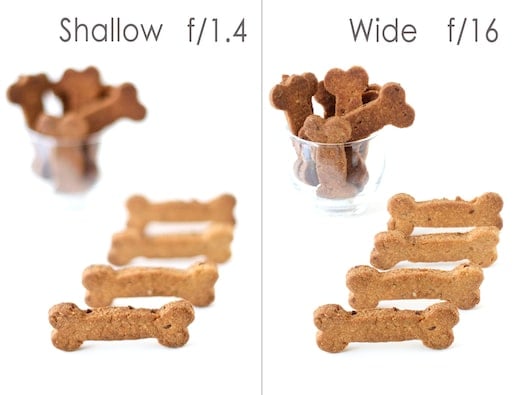
Dog Biscuits image:
- The left shallow depth of field image has only the front doggie biscuit in focus.
- When the f-stop is opened up wide, the ALL the doggie biscuits are in focus!
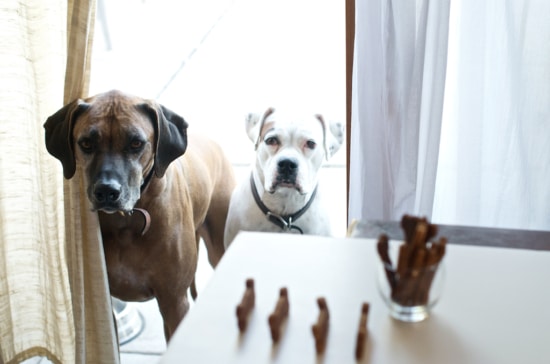
Our doggies love the wide depth field cause they can see ALL the doggie biscuits!
There are two main purposes to controlling Aperture:
- Primary reason – to control how much of the image you want in focus for the photograph. By making the hole bigger (smaller f-stop numbers on camera=more shallow depth of field) or smaller (bigger f-stop numbers on camera=deeper depth of field), you can control the amount of FOCUS.
- To adjust the Exposure when shooting in Manual. A faster f-stop, bigger hole (smaller number) will let in more light, and less of the image will be in focus. A slower f-stop, smaller hole (bigger number) will let in less light, and more of the image will be in focus.
Final Thoughts on Aperture: In order to really start understanding, you have to practice. Reading about it will only allow your brain to get so far.
Find the Aperture Priority Mode on your camera (some point & shoots may not have this option).
- In Aperture Priority, you will be telling the camera what Aperture you want to shoot at, and it will adjust the rest to get what it thinks is the correct exposure (usually this will at least get you close to a decent exposure.)
- Remember – Fast Aperture Number (1.4, 2, etc…aka wide aperture-recall it is a bigger hole opening) = More shallow depth of field
- Slow Aperture Number ( 10, 13, etc… aka narrow aperture) = A deeper depth of field
- POTENTIAL PROBLEMS:
- Your lens will limit how much you can open the aperture (how small the number will get). Some lenses won’t allow a very shallow depth of field.
- If you do have a very fast lens (1.2, 1.4, etc…) and are shooting on those lower aperture numbers, the super shallow depth of field can make getting a good focal point tricky. The tip of the nose might be in focus and everything else starting to get blurry. It takes time & practice to shoot very shallow depth of fields well.
- Many times in order to get a correct exposure, larger aperture number (bigger numbers ie. 13, 16) require a slow shutter speed. This can result in camera shake if you are not shooting on a tripod.
- How to find out fast is your lens or the speed of our lens? The lowest f/stop number your lens can achieve is usually written on the barrel of the lens.
Now go shoot something and play with Depth of Field. Choose what you want in focus or choose it all to be in focus. Either way, there is no right or wrong. You have the creative control to decide what type of look you want for your photograph.
Whew! Is it time for another drink yet? We’re ready for it!
We know this is a lot of info to digest. Read it a few times, and try to understand at least the depth of field part. That will help you get more creative with your photography. By the time you go full manual, it helps to understand the full concept of aperture in order to use your camera fluidly, so don’t throw that part of it out of your brain just yet. Slowly build your understanding through practice and finding other ways people have explained it. All of us learn differently, so it helps to have exposure to different forms of teaching.
*********************************************
Photography Series: Understanding these concepts one step at a time will help you capture the images that you want.
1. Exposure
2. Shutter-Speed – “Controlling Motion”
3. Aperture – “Controlling Depth of Field” – This Post!
4. ISO
5. White Balance – Up Next!!
6. Flash Your Food Photography #1- Using Built-in Camera Flash for DSLR and Point & Shoot. Includes some tips to making your own accessories.
7. Flash Your Food Photography #2- Using Speedlight Flashes ON the camera
8. Flash Your Food Photography #3 – Using Speedlight Flashes OFF the camera with remotes, sync cords, triggers and commander mode. (Cool cocktail shots will be highlighted here! )
9. Flash Your Food Photography #4 – Using multiple Speedlight Flashes or Strobes OFF the camera. Short discussion of Dedicated vs. Non-Dedicated flash mounts.
10. Natural light Food Photography
11. Photography inside restaurants, kitchens and capturing Chefs in action.
12. Editing
[ad]




Great series, thanks! Now to start playing with my new camera…!
wow amazing where is the rest of the course?? I need to know about white balance to start my journey with photography.
I just read the entire series, thank you so much for the helpful tips! I hope you also decide to write a bit about focus and your photography tools (what camera and lenses you use, etc.).
Oh yes, when is the book coming out?
It would be a winner.
Just a year or so late finding your terrific material here…
And just having completed a 2-day so-called intensive on the SLR at Cooper Union that didn’t come close to informing this kind of material, I am so happy to have found you.
Thank you, thank you, thank you!!
Carolg
Hi. My name is INAN from Germany. I love your Blog! Thanx for sharing your knowledge about food photography. My Question is:
When will you write the articles about:
FLASH YOUR FOOD PHOTOGRAPHY
NATURAL LIGHT FOOD PHOTOGRAPHY
PHOTOGRAPHY INSIDE RESTAURANTS
and EDITING
??????????????????????????????????????????????
Please go ahead and write these articles 🙂
Bye from Germany . . .
INAN
Inan – Thank you for the compliments. We definitely still plan to write about each of those topics, we’ve just been too busy at our studio to write the tutorials properly. Don’t know when we will be able to get to it, but it shall be done some time in the future.
That was a great tutorial! I must have read it about a dozen times 🙂 I didn’t know anything about Aperture and Shutter speed before, but with this tutorial, I understand it a lot better…Like you said, “Practice, practice, practice”…Just got my first DSLR and I can’t wait to apply what i’ve learned…Thanks for sharing 🙂
So what is a general rule of thumb for the aperauture setting on a dinner plate? I statred with the 1.8, and it looks like only maybe 1/10 of the photo is in focus. At 3.5 it still isn’t looking good. Do I need to be closer to 7 to get most of a plate at a 15-30 angle of view in focus? Nothing looks right to me, would a 100mm get more in focus with a better background blur?
The depth of field is dependent of the relationship between the lens and aperture. Diff. focal length will have diff. depths of field at the same aperture. A micro (also known as a macro) lens will also have a more pronounced depth of field than a lens that isn’t a micro yet is still of the same focal length. Confusing huh? Best way is to shoot with the lens you like and adjust the aperture until you find the depth of field you like. This is what everyone refers to as “practice, practice, practice.” Soon you’ll start to know your equipment and can adjust to get what you want.
Keep closing down the aperture (make the number bigger) until you get what you want clean. 3.5 is still fairly shallow. Hit 6.4, 7.1 and see how you like them. Keep increasing the number to find what you like. That is the beauty of digital in that we get instant feedback. Zoom in on the image or tether, if you can, so you can see everything instantly.
A deeper focal length will change the perspective as well. If we shoot something with the 105mm vs the 50mm, the objects in the background and foreground will seem closer to the subject with the 105mm. If you have an assortment of lenses to shoot with, or can rent, play with them to see what you like better. A telephoto tends to compress the images, which is sometimes wanted and other times not. We’ll be doing a post on it to give a visual representation of what we mean. Hope this helps in the mean time.
thanks, good info, I have to practice, practice, practice.
Just discovered your blog and am very thankful for the photography lessons (and info on Japan since I am traveling there in May). Thanks!!
Drape analogy was genius! Thank you!
Hi There,
Thanks for the tutorials – they are super easy to read and understand! I do have a question on DOF though: I’ve been told that using a telephoto lens gives pictures a very “flat” or “flattened” look. I _kind of_ understand, but am not really sure I’m getting the concept. So is this flat look a bad thing? Abnormal? To be avoided at all costs? I’d love to see a post or reply on this one..
Thanks again!
thanks for the tips!
Nice article!
Really like the easy explanations- I think for someone who is starting to learn about these concepts this is great place to understand what all these numbers and names mean.