Principles of Photography-ISO – Controlling camera’s light sensitivity
In our Principles of Photography Workshop Series we try our best to share what we were able to teach ourselves about photography, in simple, easy-to-understand concepts. These are just some basics to help you get started, there is much more information to learn beyond these basics. But by understanding the most basic principles of photography then building upon them through practice, practice and more practice, you can capture the type of images that you want.
Note: Teaching and understanding photography can be often be complicated and confusing. Of course, there are many ways to explain these concepts & there is no “right” way to teach this. So if you think you can explain it better, then obviously you don’t need our help. Now, everyone grab your camera and let’s start figuring this stuff out together! And have fun!
For those of you who have been following this series, we all have gone over most of the elements that make up Exposure. First there was Shutter Speed, then we went over Aperture. With this post we’ll go over the final main element of how your camera gets its Exposure, ISO, then we’ll try to tie them in all together.
What is ISO on your camera?
- ISO refers to how sensitive your camera is to light. Originally this referred to the film, but with digital cameras, the ISO sensitivity is in reference to the camera’s sensor.
- Basically, the more sensitive your camera is to light, the higher the ISO number, the more possible it is to shoot in low light situations.
- Higher ISO number = higher sensitivity to light = better ability to shoot in low light
How is ISO measured?
- ISO is measured by numbers that are based on an older film standard. For example, film comes in different speeds such as 100, 200, 400, 800 and above. Recommended film speeds for daylight or bright, outdoor situations usually calls for 100-200 speed film. Darker situations, indoor shots or sports shots called for the higher speed films.
- The same number now refers to the the sensors on digital cameras, which are measured in the same numbers.
- The lower the number, the less sensitive, the higher the number, the more sensitive the camera’s sensor will be. The numbers can range anywhere from 50 to 6400 and beyond, depending on the camera.
- So, if you’re shooting in lower light situations and your pictures come out too dark, you can increase your ISO number to make it more sensitive to light, making the photographs brighter.
How do you control ISO?
- Almost all cameras will allow you to manually adjust your ISO setting, however many also offer an Auto-ISO mode, or something named similarly. Usually in this mode, you are able to tell the camera the parameters you want it to stay in (highest ISO, lowest shutter speed.) Check your manual or search online for your individual camera on how to do this. Every camera varies.
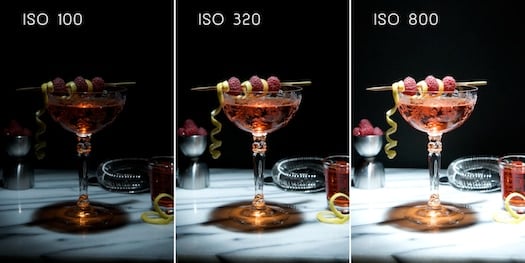
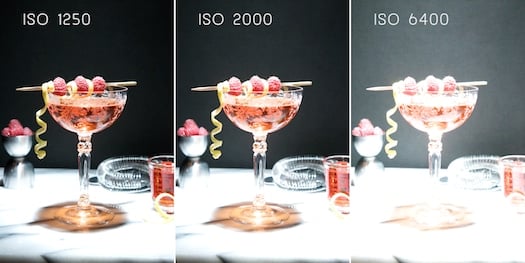
Example of ISO light sensitivity: One way to control your exposure is by controlling the ISO
In the above examples, ISO 100 is dark, but as the ISO is increased to 320 and 800, the exposure is increased, thus, more light into the image.
As the ISO continues to increase, more light enters the photo. But as the ISO increases you can start to see Grain & Noise (read below)
How will controlling the ISO help with your photography?
- Increasing the ISO (which increases the camera’s sensitivity to light) allows you to capture images in lower light. However it does come at a cost.
- Potential Problems– Noise & Grain —The higher the ISO, the more the camera will pic up other atmospheric stuff resulting in “noise” or a graininess in the image. Usually this isn’t appealing although sometimes you can use it stylistically for a very cool image. Ever camera sensor is different, but usually the better the camera, the higher you are able to raise the ISO without experiencing noticeable “noise.” Some cameras will start showing noticeable noise as low as ISO 400, while others may look great up to ISO 800, 1000, or even 1600.
- Increasing the ISO will expand your camera and lens’ limits in particular environments:
- Increasing the ISO, you can use a faster shutter speed, lessening the chances for “camera shake” or allowing you to freeze motion a little better. See Shutter Speed post to help understand this.
- Increasing the ISO, you can use a more shallow aperture setting (higher number), allowing you to get a deeper depth of field. See Aperture post to help understand this.
Creative choices with Grain & Noise- Sometimes high grain pictures can be artistic & are used frequently to convey a vintage, gritty, raw and moody quality to your photographs. You can decide!
Final thoughts on ISO
- ISO is the third and final element to how your camera captures light to get its exposure. Remember, Shutter Speed (how long the camera captures light) + Aperture (how much light – how big the “hole” opening is in the lens)+ ISO (how sensitive the camera is to light)= Exposure (the total amount of light used to create your image).
- Controlling ISO is usually done creatively more for the purpose of helping either the Shutter Speed or Aperture, or both. By itself ISO doesn’t have much creative qualities other than to introduce “noise” at higher ISO settings (which as mentioned before, can be kinda cool at times.)
- Play with your camera to see at what point you start noticing noise in your images. There are ways in many editing software programs to help reduce or clean up noise in photos, so even if you have to shoot at a higher ISO than you’d like, sometimes you can still get fairly clean image after editing. A “noisy” image is better than no image or a super underexposed (dark) image.
When you are ready to shoot Manual ~ Putting it all together ~ Exposure= Shutter Speed + Aperture + ISO
After playing with each of the individual elements of exposure & understanding what they all do by themselves, you can develop the freedom of completely controlling your camera by putting it all together and shoot on the Manual Mode.
Here are a few things reiterating on the principles of Exposure and to hopefully help ease the confusion and frustration of shooting on manual:
- Shutter Speed and Aperture work inverse of each other while ISO is a third party that only increases the sensitivity of the camera. What that means is:
- If you aren’t touching the ISO, shutter speed and aperture work like two sides of a scale to get a proper exposure. If you increase one, you have to decrease the other in order to get the same exposure.
- If you are shooting and the shutter speed is more important to you, lets say you’d like to increase the shutter speed (shutter opens and closes faster) in order to freeze the action better; you’ll have to decrease the aperture number (the hole gets bigger letting in more light.) Say f/8 and 1/60 get a good exposure. To get approx. the same exposure but freeze the action better, shoot at f/2.8 and 1/500 (if your lens will get that big of an aperture ~ many won’t).
- If you are shooting and the depth of field is more important to you, let’s say you want a deeper depth of field, you can make the aperture number got bigger (the hole is now smaller-remember the drapes analogy) then change the shutter speed to a smaller (slower) number and now it will stay open longer and you’ll to get the same exposure. If you shot your image at f/4 aperture and 1/60 shutter speed, you could shoot at about f/13 aperture and 1/5 shutter speed and get about the same exposure.
Now in this situation where we would be shooting using a slow shutter speed, it would be very hard to shoot only holding the camera by hand because the shutter is so slow you will certainly have camera shake. There are three main options to help this.
- Increase the light available by using a flash, upping the lights or shooting in a brighter spot. Now you”l be able to shoot using a faster shutter speed to get a good exposure.
- Use a tripod or prop the camera on something to take the shot. However, if your subject is moving, you will still get motion blur ~ this can be stylistically cool, though.
- Increase the ISO to make the camera more sensitive to light. However increase too much and you’ll start getting a “noisy” image.
- Obviously, these all work if you want to go the other way, too. If you want a slower shutter to capture more flowing motion, decrease the shutter speed (shutter opens and closes slower letting in more light) and increase the aperture number (making the hole smaller letting in less light). If you want a more shallow depth of field, decrease the aperture number (increases the hole size letting more light in) and increase the shutter speed (shutter opens and closes faster letting less light in).
Is it all starting to make sense? Or is you head spinning like you just pounded 4 Long Island Iced Teas, was spun around and then someone asked you to pin the tail on the donkey? If it doesn’t make sense yet, don’t worry. It takes time, practice, and repetitive experience to fully wrap your brain around this stuff. Remember to practice each element by itself by shooting Shutter Priority, Aperture Priority and by shooting manual and only adjusting the ISO to see how they all behave. Understand each element comfortably, then move on to try and put them all together. This is at least what we’ve done for ourselves and it has helped us learn and understand photography by self-teaching. Hopefully it will help you on your way to becoming fluid and comfortable with you camera.
******************************************
Photography Series: Understanding these concepts one step at a time will help you capture the images that you want. (We need to discuss basic photography principles before we jump to Flash Food Photography because photographing with flashes can be more technical. Grasping basic exposure concepts will make flash food photography easier. Thanks for your patience!)
1. Exposure
2. Shutter-Speed – “Controlling Motion”
3. Aperture – “Controlling Depth of Field”
4. ISO
5. White Balance
6. Flash Your Food Photography #1- Using Built-in Camera Flash for DSLR and Point & Shoot. Includes some tips to making your own accessories.
7. Flash Your Food Photography #2- Using Speedlight Flashes ON the camera
8. Flash Your Food Photography #3 – Using Speedlight Flashes OFF the camera with remotes, sync cords, triggers and commander mode. (Cool cocktail shots will be highlighted here! )
9. Flash Your Food Photography #4 – Using multiple Speedlight Flashes or Strobes OFF the camera. Short discussion of Dedicated vs. Non-Dedicated flash mounts.
10. Natural light Food Photography
11. Photography inside restaurants, kitchens and capturing Chefs in action.
12. Editing
[ad]



I finally understand! Thank you so much. I wish I found your articles after Christmas when I got my new camera! Better late than never.
Thanks a lot, This is very helpful information. Especially liked the ISO exposure pictures and the way it helps understand the concept you are explaining.
Thank you for this. I can’t tell you how many countless articles I’ve read on the basics of shutter speed, aperature, and ISO (including taking a physical class on photography) and your photography series is the first time I actually understood it! Your explanations finally clicked for me! Now if I can just get them to become second nature… I’ll keep practicing!