Principles of Photography – White Balance
In our Principles of Photography Workshop Series we try our best to share what we were able to teach ourselves about photography, in simple, easy-to-understand concepts. These are just some basics to help you get started, there is much more information to learn beyond these basics. But by understanding the most basic principles of photography then building upon them through practice, practice and more practice, you can capture the type of images that you want.
Note: Teaching and understanding photography can be often be complicated and confusing. Of course, there are many ways to explain these concepts & there is no “right” way to teach this. So if you think you can explain it better, then obviously you don’t need our help. ![]() Now, everyone grab your camera and let’s start figuring this stuff out together! And have fun!
Now, everyone grab your camera and let’s start figuring this stuff out together! And have fun!
For those of you who have been following this series, we all have gone over the elements that make up Exposure – Shutter Speed, Aperture, and ISO. In doing so, we’ve learned how to control how bright or dark our images are, how to capture motion, how to control the depth of field, and how to control the quality of the noise in the image. However there is one final basic principle to digital photography that needs to be covered before we really start getting into the fun stuff, White Balance.
What is White Balance?
- White balance is basically a way to “measure” the temperature of light and to “balance” out the colors of your photography for the desired results.
- Ideally, the goal of a conventional photograph is to attain an ideal White Balance where the white color is as close to true, neutral white as possible and all of the colors in your image are “true to life.”
What is White Balance on your camera?
- White Balance refers to how your camera reads and adjusts to the temperature of the light.
- Every light source has a different “color” or “temperature” to them. Our eyes adjust to this fairly well, but digital cameras need a little help, hence the White Balance function.
- If you’ve ever taken a photo and the colors of the image are not the same that you see, maybe everything looks blue or reddish-yellow, then you are seeing an incorrect White Balance.
- Most digital cameras have functions for Auto White Balance, a group of preset White Balance (sunny, cloudy, shade, flash, fluorescent, etc…), and a Custom Preset that you can set yourself.
How is the color temperature for White Balance measured?
- Light’s color temperature is measured using the Kelvin Scale. Warmer light (more reddish yellow) have a lower number while cooler light (bluish light) has a higher number. A candle flame is somewhere around 1200-2000 K, high noon sun is somewhere around 5000-6000 K, and a deep, rich twilight blue sky may be around 10,00 – 15,000 K. Think candle flames. The yellow part of the flame is less intense than the blue part of the flame and the yellow flame would have a lower temperature than blue part of the flame.
- For the most part it isn’t all that necessary to know this, however some cameras have the capability to set a specific Kelvin number, and in this case it is handy to know how the numbers work. For further explanations it is time to bust out the science books and we just aren’t going there.
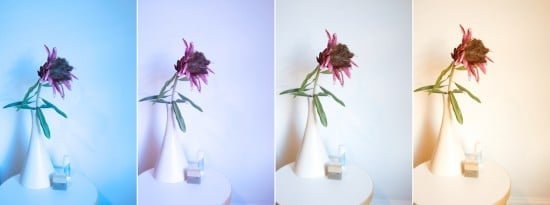
White Balance in photographs that are considered “incorrect” or “off” will show shades yellow, red, or blue color casts. Essentially what should be “white” in the photograph should not have other color casts tainting the whites. The whites should be neutral. These incorrectly white balanced photographs will can make a photograph look unrealistic.
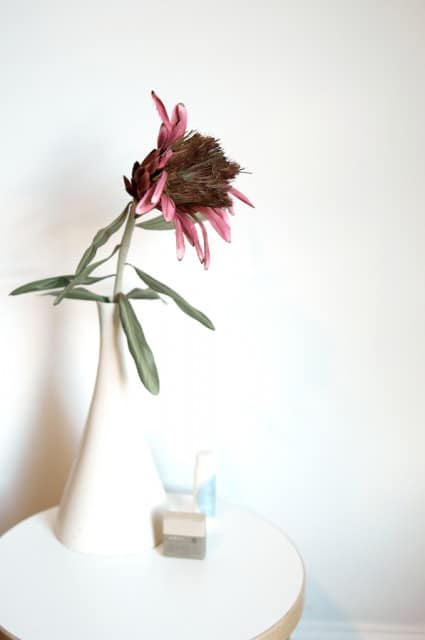
(above) the series of color casts are examples of how the White Balance of an image can be taken. Ideally, most photographs want to attain correct White Balance, like the photo below.
Best example of White Balance photograph: The white table, wall and vase remain white.
How do you control your camera’s White Balance?
- Auto White Balance- Nearly all cameras will have an Auto White Balance setting where the camera will meter the light and do its best to figure out the proper white balance automatically. Some cameras are better at this than others.
- Pre-Set’s: Next, most all cameras will have a grouping of pre-set White Balances where it will set the coloring to a particular lighting temperature. Shade, Cloudy, Direct Sun, Flash, Flourescent Light, etc. all usually have a general light temperature and these pre-sets are there to match that. Once again, this is a general estimation, but many times it will get you close to a good white balance.
- Many camera makers are very nice in that they order the pre-sets from the lowest temperature (Reddish-Yellow tones) to the Highest Temperature (Blue Tones) so if your images are a little too yellow, you can try the next setting in order and it will balance a little more towards the blues and if you are too blue you can try previous settings and it will balance a little more towards the red-yellows. Usually. If your camera behaves nicely. For info on how to change White Balace pre-sets in your camera, please consult your owners manual or google “how to change white balance on (insert your camera model)” Every camera varies.
- If you have a super cool camera, it will have a Kelvin White Balance setting where you are able to set the camera to a specific Kelvin setting. Most cameras won’t have this option, so feel lucky if you do have it.
- Custom White Balance: Lastly for in-camera white balance adjustment, there is the mode where you manually meter and set the white balance. This can be done a variety of ways, so let’s give it a whole paragraph to itself. That will be next.
- Post-Production White Balance: White Balance can often be set or adjusted in post-production depending on how you shot (jpeg or raw) and on your editing software, although some of the leading editing software like Lightroom and Aperture can now adjust the white balance on most any type of file. The how-to’s for this are fairly in-depth so we aren’t going to discuss post-production editing now. This tutorial is about how to get the best out of your camera. One note about Raw vs Jpeg, even though jpeg can now be edited for white balance, the raw files will have a broader range of colors that are captured, giving a better final image. Yes, the files are much larger, so you have to choose quality or quantity.
How to do you set Custom White Balance in your Camera?
- In setting the custom white balance, you are capturing a whole image that is a neutral white or gray in the light source where you’ll be shooting your intended subject and then telling your camera that this image you want to base the light temperature off of.
- For the specifics on how to meter and set your custom white balance within your camera, refer to your manual or google it since each camera varies. What we are going to go over are some of the options on how to get that image to base the white balance off of.
- Quick and Rough – Take a picture of a white napkin or sheet of paper so it fills the whole frame and use this image to set your custom white balance. Usually gets pretty damn close. Warning: some cameras need you to go into your custom white balance function first, then in setting the custom white balance it will request an image, and then you’ll shoot your neutral target. Other cameras can take a previously shot image or will request one.
- Fancy Targets – There are “professional” products that can replace the white napkin of the previous example; stuff like this Digital Calibration Target. You do the same as before, shoot it then use the image to set the white balance.
- ExpoDisc – The previous examples were using reflected light. Your light source bounced off of the napkin or target and you metered off of that. ExpoDiscs work by scattering your source light directly at the lens to give a “more accurate” neutral gray image to use in setting your custom white balance. In this case, put the ExpoDisc over the lens, place your camera at the point of your intended subject, aim back towards your source light, then shoot an image to use for setting the white balance. Sometimes is it tricky to aim back at the source light because it may be coming from multiple sources.
- There are also gray cards and other targets which you can use for post production. (We know, this isn’t in-camera stuff and we said we weren’t going to cover it, however you can just count this one as a little added bonus!) For these you’ll usually shoot one image with the gray card in it, then another without. In post production you can now use the first image to get the white balance and apply those settings to the second image. There are even iPhone apps that work as a gray card.
Creative choices beyond conventional White Balance– Color casts can be cool!

- Conventional photographs strive to attain the most correct White Balance where the whites remain neutral, without any tainting of other hues. But, sometimes stylistic and creative photographs don’t strive to attain correct white balance. Vintage or other artistic hues that go against conventional white balance standards can be very stylistic and cool! So you decide how you want to convey your style of photography!
- Good photography conveys a mood or emotion and that is often influenced by the color tones of the image. Sometimes a “perfectly calibrated white balance” isn’t the best choice because it wipes out that mood. If you have a shot of a cold storm passing over a mountain range, a perfect white balance may appear gray and drab, while a slightly “off” one that is a touch on the blue side will give a dramatic, powerful feeling. You can feel the storm biting through your layers. Remember, photography is about visual expression. Your style can be calculating, precise and “real” or it can be artful and expressive or somewhere in between. That is for you to decide.
**********************************************************
Photography Series: Understanding these concepts one step at a time will help you capture the images that you want.
1. Exposure
2. Shutter-Speed – “Controlling Motion”
3. Aperture – “Controlling Depth of Field”
4. ISO
5. White Balance
6. Flash Your Food Photography #1- Using Built-in Camera Flash for DSLR and Point & Shoot. Includes some tips to making your own accessories.
7. Flash Your Food Photography #2- Using Speedlight Flashes ON the camera
8. Flash Your Food Photography #3 – Using Speedlight Flashes OFF the camera with remotes, sync cords, triggers and commander mode. (Cool cocktail shots will be highlighted here! )
9. Flash Your Food Photography #4 – Using multiple Speedlight Flashes or Strobes OFF the camera. Short discussion of Dedicated vs. Non-Dedicated flash mounts.
10. Natural light Food Photography
11. Photography inside restaurants, kitchens and capturing Chefs in action.
12. Editing
[ad]


splendid………….it will improve my skills
Very very educative. With this article i can venture into shooting better out door pics. Full credit to the posting .
BW
Mohan
I’ve never used the custom white balance before. Just checked it out on my camera. Think I’ll be experimenting this weekend. Thanks for the tips
Using the custom white balance and also the Kelvin Scale setting, if you’re camera has it, can be the missing links to a good shot. Glad you’re playing with it!
Love the series! THANK YOU! ^.^
Thank you for taking the time to share these information.
I can’t wait for the flash photography part to come out, actually, scratch that, can’t wait for the rest of the series to come out. I’ve been having trouble with lighting, and some people I’ve met said to use flash, some said no. Can’t wait to find out your take on it 🙂
This information is really helpful – I’ve read it about 10x now. I’m starting to learn how to take pictures indoors for my blog, and its REALLY hard. White balance is something that I’m really struggling with. Thank you for taking the time to write all this for those of us who are still learning how to get the most out of dSLRs!